

What is Behat?
Behat is a behavior-driven development test framework. Its intention is to help in the aid of communication between developers, clients and stakeholders during the software development process. The standout of Behat over other testing frameworks is to write tests using normal human-like language, similar to how you might write better LLM prompts for AI code generation.
Tests written in Behat can be integrated into Selenium as well as other browser emulation tools, so failures can be captured in the form of screenshots. Test scenarios are written in Gherkin using a “Given, When, Then” syntax, that explains the business logic to be tested.
With a complex framework such as Magento 2, it is a great idea to use some sort of automated testing tool as it allows you to be remain confident during the development process, so you always know that deployed code is in a successful state.
The set-up is pretty easy. We are going to first install the required dependencies with Composer, then download & run the Selenium standalone server with ChromeDriver, initiate Behat to set up some base classes, and write some scenarios to test the full setup.
Assumptions
This article assumes you have the Java Runtime binary installed on your host machine, as well as a running & functional Magento development environment. If you do not, check out the popular docker-magento project to easily set one up.
In order to get access to the behat binaries, we need to first install them with Composer. We can do that by executing the following lines at our bash prompt:
composer require --dev --with-all-dependencies \
behat/behat \
behat/mink-extension \
'behat/mink-goutte-driver:^1.3' \
behat/mink-selenium2-driver \
bex/behat-magento2-extensionThe last line installs the Behat Magento 2 extension, which allows you to easily inject Magento services into Behat code. This isn’t a normal Magento module though, as you don’t need to enable it or run database upgrade scripts. We’ll just be using the source code from it in our test scripts.
If using Docker, you’ll also need to add DNS entries to the redis & db services in order for Behat to be able to connect to them from your host machine. You can do this by executing the following lines:
echo "127.0.0.1 ::1 db" | sudo tee -a /etc/hosts
echo "127.0.0.1 ::1 redis" | sudo tee -a /etc/hostsThe Selenium Standalone server
Selenium Standalone server is a Java-based application that is used to start the Selenium server. It is basically a proxy that pipes Selenium tests & commands to remote browser instances. This provides an easy way to run tests in parallel from multiple machines.
In order to get things working, you’ll need to download the Selenium standalone server. You will also need to download ChromeDriver.
Move the chromedriver binary to a location on your host machine, and then make it executable:
mv ~/Downloads/chromedriver /usr/local/bin/
mv ~/Downloads/selenium-server-standalone-2.43.1.jar /usr/local/bin/
chmod u+x /usr/local/bin/chromedriver /usr/local/bin/selenium-server-standalone-2.43.1.jarAdding it to the /usr/local/bin folder allows you to run the chromedriver command globally from any terminal prompt.
Now navigate to Magento source code directory and create a behat.yml file there that contains the following content:
default:
extensions:
Bex\Behat\Magento2Extension: ~
Behat\MinkExtension:
default_session: goutte
javascript_session: selenium2
base_url: https://magento.test
browser_name: chrome
goutte:
guzzle_parameters:
verify: false
selenium2:
wd_host: 127.0.0.1:4444/wd/hub
browser: chrome
capabilities:
browserName: chrome
browserVersion: '*'
browser: chrome
suites:
application:
autowire: true
contexts:
- FeatureContext
services: '@bex.magento2_extension.service_container'❗️ Be sure to update the value for the
base_urlproperty to the value of your Magento store’s base URL!
Then, run behat with the --init flag to create the features folder and initialize the base classes:
vendor/bin/behat --initThis should output something similar to the following:

Edit the FeatureContext class of the newly created file at features/bootstrap/FeatureContext.php to make it extend MinkContext. This adds a lot of functionality to your in-browser testing, and you can further customize this class as you see fit.
To help kick things off, I also created the spin() and scrollIntoView() methods below that you may also find useful when writing your own scenario step implementations:
<?php
declare(strict_types=1);
use Behat\Behat\Context\Context;
use Behat\MinkExtension\Context\MinkContext;
use Magento\Store\Model\StoreManagerInterface;
/**
* Defines application features from the specific context.
*/
class FeatureContext extends MinkContext implements Context
{
/**
* Initializes context.
*
* Every scenario gets its own context instance.
* You can also pass arbitrary arguments to the
* context constructor through behat.yml.
*/
public function __construct(
private StoreManagerInterface $storeManagerInterface,
) {}
/**
* @param $lambda
* @param $wait
* @return bool
* @throws Exception
*/
public function spin($lambda, $wait = 60)
{
for ($i = 0; $i < $wait; $i++) {
try {
if ($lambda($this)) {
return true;
}
} catch (Exception $e) {}
sleep(1);
}
$backtrace = debug_backtrace();
throw new \Exception(
"Timeout thrown by " . $backtrace[1]['class'] . "::" . $backtrace[1]['function'] . "()\n" .
$backtrace[1]['file'] . ", line " . $backtrace[1]['line']
);
}
/**
* @param $cssSelector
* @return void
* @throws Exception
*/
public function scrollIntoView($cssSelector)
{
$function = <<<JS
(
function()
{
document.querySelector("$cssSelector").scrollIntoView();
})()
JS;
try {
$this->getSession()->executeScript($function);
} catch (Exception $e) {
throw new \Exception("Scroll Into View Failed. Check Your Script");
}
}
}❓ Where does
MinkContextcome from? It is derived from Mink, which removes the differences between the many different browser emulators. This provides an easy way to write code for many emulators. To get more info on Mink and all of the available methods, check out the Mink documentation.
Finally, we need to start the Selenium server with a java command prompt, in order for the client to be able to connect to it:
java -jar /usr/local/bin/selenium-server-standalone-2.43.1.jar -Dwebdriver.chrome.driver="/usr/local/bin/chromedriver"To ensure Selenium runs correctly, you should see output similar to the following:
10:14:30.290 INFO - Launching a standalone server
Setting system property webdriver.chrome.driver to “/usr/local/bin/chromedriver”
10:14:30.325 INFO - Java: Oracle Corporation 25.321-b07
10:14:30.325 INFO - OS: Mac OS X 12.1 x86_64
10:14:30.334 INFO - v2.43.1, with Core v2.43.1. Built from revision 5163bce
10:14:30.390 INFO - Default driver org.openqa.selenium.ie.InternetExplorerDriver registration is skipped: registration capabilities Capabilities [{ensureCleanSession=true, browserName=internet explorer, version=, platform=WINDOWS}] does not match with current platform: MAC
10:14:30.450 INFO - RemoteWebDriver instances should connect to: http://127.0.0.1:4444/wd/hub
10:14:30.451 INFO - Version Jetty/5.1.x
10:14:30.451 INFO - Started HttpContext[/selenium-server,/selenium-server]
10:14:30.493 INFO - Started org.openqa.jetty.jetty.servlet.ServletHandler@6debcae2
10:14:30.493 INFO - Started HttpContext[/wd,/wd]
10:14:30.493 INFO - Started HttpContext[/selenium-server/driver,/selenium-server/driver]
10:14:30.493 INFO - Started HttpContext[/,/]
10:14:30.497 INFO - Started SocketListener on 0.0.0.0:4444
10:14:30.497 INFO - Started org.openqa.jetty.jetty.Server@b1bc7edWriting features with Behat
Feature files are written in Gherkin language and contain scenarios for that specific feature. To learn more, you can read about features and scenarios in the Behat documentation.
Features are stored in the features directory and have the file extension .feature. In order to test your Behat setup, create a file at features/catalog.feature file with the following content:
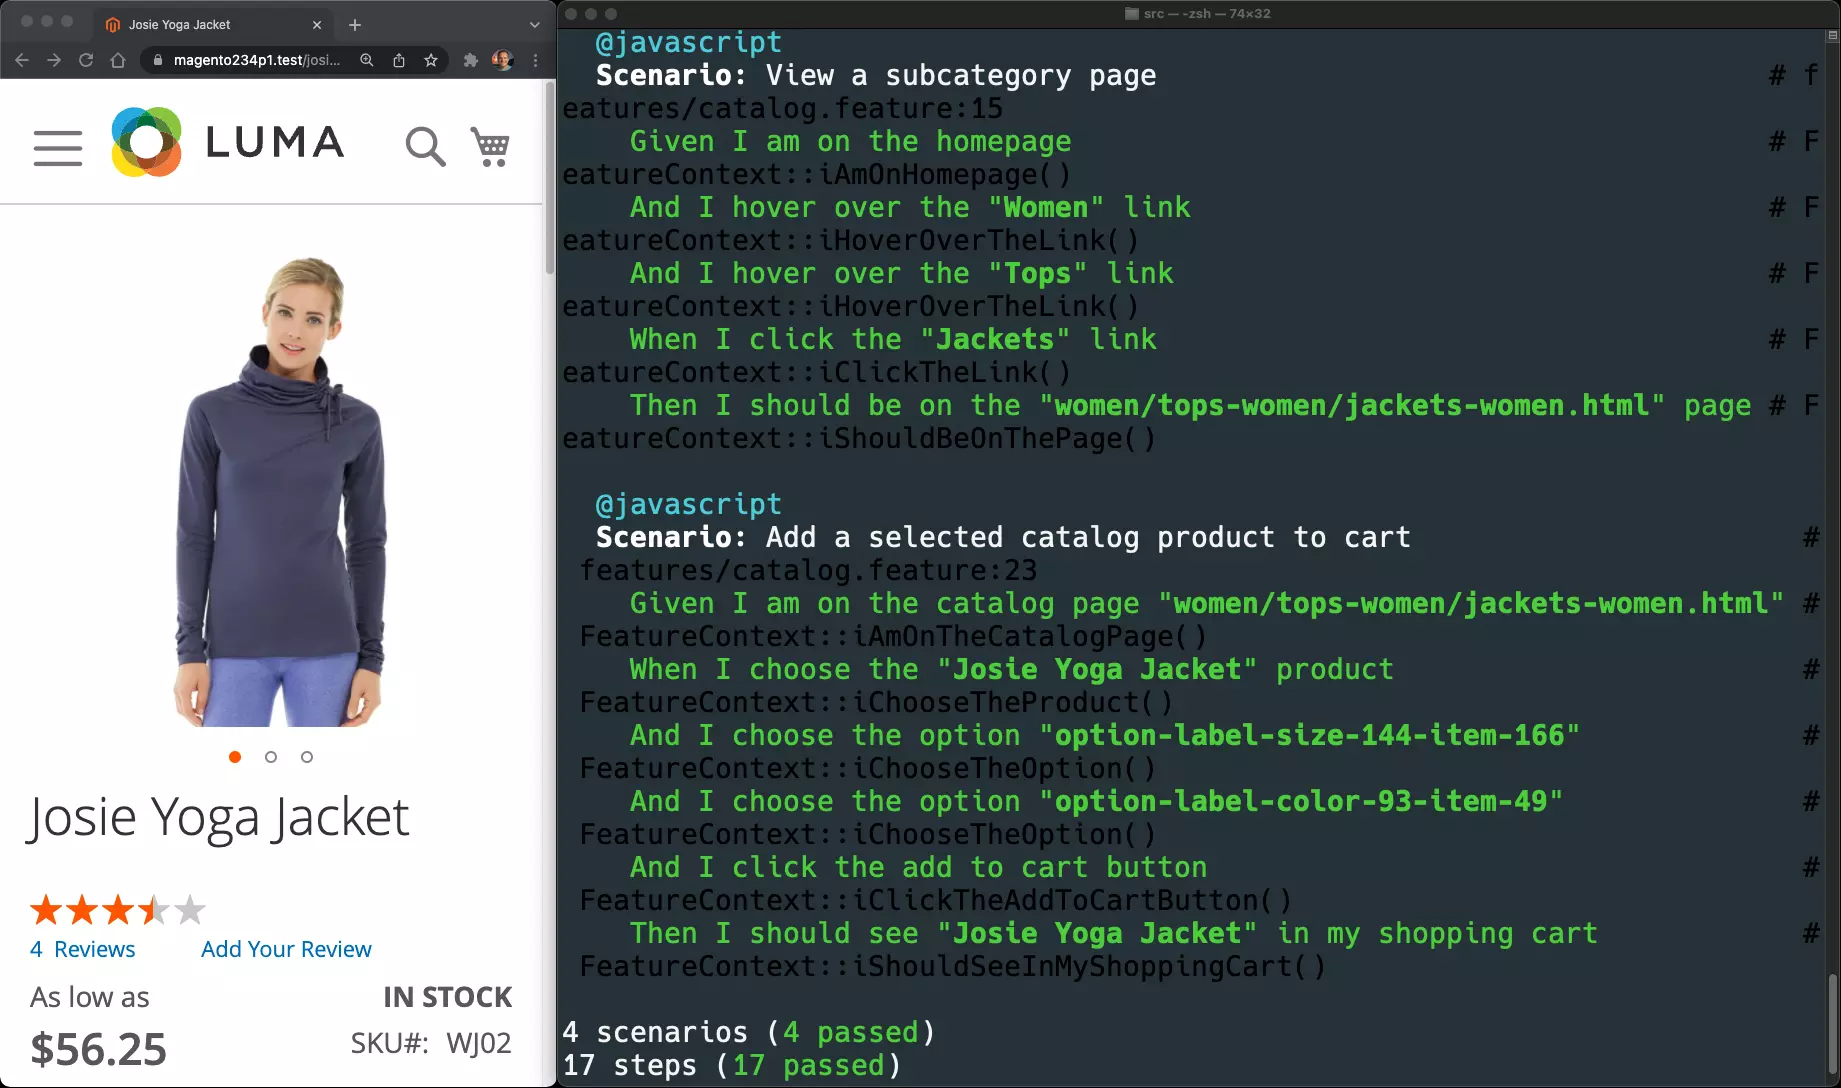
Feature: In order to find the product I want to buy
As a customer I want to able to browse the store catalog
Scenario: What's new catalog products
Given I am on the homepage
And I click the "What's New" link
Then I should see "What's New"
Scenario: View a top category page
Given I am on the homepage
And I click the "Women" link
Then I should be on the "women.html" page
@javascript
Scenario: View a subcategory page
Given I am on the homepage
And I hover over the "Women" link
And I hover over the "Tops" link
When I click the "Jackets" link
Then I should be on the "women/tops-women/jackets-women.html" page
@javascript
Scenario: Add a selected catalog product to cart
Given I am on the catalog page "women/tops-women/jackets-women.html"
When I choose the "Josie Yoga Jacket" product
And I choose the option "option-label-size-144-item-166"
And I choose the option "option-label-color-93-item-49"
And I click the add to cart button
Then I should see "Josie Yoga Jacket" in my shopping cartThis is that “Given, When, Then” syntax that I talked about before. It’s a simple human language that is used to right up the different testing scenarios.
Note the @javascript tag. This tells Behat to switch the driver used to be able to handle execution of javascript as defined in behat.yml. In order to implement functionality in different Context classes, I use traits and then add them to the FeatureContext class. This allows the usage of the MinkContext methods in contexts other than FeatureContext.
For example, here is the CatalogContext trait located at features/bootstrap/CatalogContext.php, and it is used for the above catalog.feature file.
Note that it is also possible to use a PHPUnit Assert class within your context traits:
<?php
declare(strict_types=1);
use PHPUnit\Framework\Assert as PHPUnit;
trait CatalogContext
{
/**
* @Given I click the :link link
*/
public function iClickTheLink($link)
{
$this->spin(function($context) use ($link) {
$page = $context->getSession()->getPage();
$page->clickLink($link);
return true;
});
}
/**
* @Given I hover over the :link link
*/
public function iHoverOverTheLink($link)
{
$this->spin(function($context) use ($link) {
$element = $context->getSession()->getPage()->findLink($link);
$element->mouseOver();
return true;
}, 5);
}
/**
* @Then I should be on the :page page
*/
public function iShouldBeOnThePage($page)
{
$testcase = $this->getSession()->getCurrentUrl();
$storeBaseUrl = $this->storeManagerInterface
->getStore()
->getBaseUrl(\Magento\Framework\UrlInterface::URL_TYPE_WEB);
$expected = $storeBaseUrl . $page;
PHPUnit::assertEquals($expected, $testcase);
}
/**
* @Given I am on the catalog page :page
*/
public function iAmOnTheCatalogPage($page)
{
$this->visit($page);
}
/**
* @When I choose the :product product
*/
public function iChooseTheProduct($product)
{
$this->spin(function($context) use ($product) {
$element = $context->getSession()->getPage()
->findLink($product);
$element->click();
return true;
}, 5);
}
/**
* @When I choose the option :option
*/
public function iChooseTheOption($option)
{
try {
$this->spin(function($context) use ($option) {
$script = "require(['jquery', 'domReady!'], function($) {
$('#$option').click();
});";
$context->getSession()->wait(1000);
$context->getSession()->getDriver()->executeScript($script);
return true;
});
} catch (\Exception $e) {
throw new Exception($e->getMessage());
}
}
/**
* @When I click the add to cart button
*/
public function iClickTheAddToCartButton()
{
$this->spin(function($context) {
$element = $context->getSession()->getPage()
->find('xpath', '//*[@id="product-addtocart-button"]');
$element->click();
return true;
}, 5);
}
/**
* @Then I should see :product in my shopping cart
*/
public function iShouldSeeInMyShoppingCart($product)
{
try {
$this->spin(function($context) {
$script = "require(['jquery', 'domReady!'], function($) {
$('a.action.showcart').click();
});";
$context->getSession()->wait(3000);
$context->getSession()->getDriver()->executeScript($script);
return true;
});
} catch (\Exception $e) {
throw new Exception($e->getMessage());
}
$element = $this->getSession()->getPage()
->findLink('View and Edit Cart');
$element->click();
$text = $this->getSession()->getPage()->getText();
PHPUnit::assertStringContainsString($product, $text);
}
}This trait would then be imported into the FeatureContext class with a use statement:
<?php
...
class FeatureContext MinkContext implements Context
{
use CatalogContext;
...Run vendor/bin/behat features/catalog.feature and voilà: your automated test should execute!
Debugging
On Mac, it’s possible additional security policies of that operating system will prevent chromedriver from opening:
In this case, go to the /usr/local/bin directory within Finder, Right+Click, and select Open. Then, click OK to approve the security notice. Your tests should now execute on the following attempt.
Wrap-up
You can quickly notice that using Behat can dramatically help with daily Magento development. It will make you feel confident pushing out new code, knowing that regression tests are in place. Regression tests allow you to push out new features & functionality, knowing this new code that was introduced won’t break pre-existing code & functionality.
Prepared to uncover more about Magento? Check out these 3 solutions I can offer:
- Explore Magento 2 fundamentals & best practices course (1,000+ students)
- Grow your Magento expertise with all courses & lessons (700+ students)
- Get bi-weekly Magento deep-dives and learn something new every other week (9,000+ subscribers)


